skip to main |
skip to sidebar
A few photos to share from the snowfall last week. Remember the Clematis blooming on this?

Now my Climbing Hydrangea is all snuggled in under this blanket of snow!

Wouldn't you know that our cat Pia would get left out in the snow??!! She hunkered in in a warm spot in our storage area under the sunroom.

What a beautiful contrast this Yucca makes all buried in snow. A few of its stems are floundering under the weight of the snow, but will pop back upright as soon as it melts.

You can just make out the lighthouse bird feeder which has been very busy on a snowy day, with all the traffic to and from the trees!!

We are surrounded by such splendor, all wrapped up in snow!

This is the view from the sunroom. Isn't it great that I was able to get all these photos by just running in and out in my pj's?

Finally donned my boots and a light poncho to find photos to take. Here's my sheet mulching, all smothered, and I imagine glowing below with all the moisture and weight!! At this point we had about 8-10 inches of snow, with more to come the next day!!

Now tell me if you could find a more beautiful sight! Look at this stately Spruce, all bundled in snow! It's framed by the red Crab Apple. This is as pristine as it gets, before hubby gets to have a go at it with his snow blower!

This is the view from the front door. Our poor stunted white Dogwood, really shows up in the winter, but the reason for the stunting will be for another post. Notice how the Rhododendron leaves uphold the show! Those are the red shrub roses on the sides of the Dogwood and the Yucca is beyond. You can just make out the pink Tree Peony to the right of the trunk.

And in the distance towards the left are the raspberry bushes that I did not do anything with in the fall. I will prune them down in the spring, when I can distinguish between new and old plants.

This is the large Pine just behind the pool. You can see how it is overburdened by the show, dragging its branches down to the ground. This is a pretty typical situation around the gardens after a heavy snow. And when it is wet, it gets to be a problem. (This will also be in a future post) Right now I am trying to stay with the beauty of snow, not the problems it brings.

This pine next to the Climbing Hydrangea looks so tiny under the snow. It is actually now taller than Mia, which makes it 5 feet plus! You can see all the Hydrangea branches going this way and that, especially at the bottom of the tree!

Here's that splendid Butterfly Bush which was always covered in butterflies and Hummingbird Moths just a few months ago! Several of the lower branches are completely stuck down to the ground by the snow. When hubby plows the driveway the snow blower just flings its all up into the air, landing on this poor specimen. When the snow melts quickly it does not create a problem, but when it lingers, .......

Here's the Red Twig Dogwood, which is right between the Hydrangeas along my front path. This is one of the best shrubs fro New England.

For when it snows the red branches make a beautiful showing! This close up gives a closer view.

This is one of the Hydrangeas I moved in the fall to right in front of the front door. you can see the new buds which have formed right at the ends of the stems. These will be producing those beautiful blue or pink flowers next spring.

Wow! There is a lot to see in my winter gardens. I find that I notice so much more when I have camera in hand. This winter is becoming an adventure in and of itself. An adventure to see all that the winter has to present to me.
As you can see from these photos, the sheet mulch beds are shrinking. As there was no rain for quite a while it seemed as though these would never shrink down. It's only been five weeks since this bed was finished and the mulch is only about three inches deep now. It was about fourteen inches to begin with.

This other bed was completed about three weeks ago and is about 5-6 inches deep.
 You know something is supposed to work a certain way, but when you actually see it happening it just makes it more real!! I never thought it would begin to compost so quickly. I figure it would take much longer to get to these levels! And how great to not have snow yet to be able to watch it progress.
It has been hard finding the time to get to this posting to finish, but am finally here. This photo shows the garden area around the pool. It has Hosta, Daylily, Japanese Iris, Cleome and ground covers.

For the beginning of the sheet mulch process you need green mulch to get the worms coming up to the top of the soil. In looking around the gardens, these large Hosta caught my eye first. Some years I cut them back, others I have just let them die down and create their own mulch.Whether you cut back your perennials in the fall is often a matter of taste. If you do not like the way the dying foliage works, you probably cut it back as soon as it starts to get ratty looking. If you =can wait out that stage and leave it to die back in place, it provides a great mulch for next season. Also the greenery breaks down and adds nitrogen to your soil.
With the Permaculture process I will not be cutting down my plants except those that will be cut during the growing season to be used as mulch for that specific area.
I must say here that the most important thing to do in getting ready for this mulching process is to get help with it. I tried some of it by myself, but it is a very strenuous process all alone. It went much faster when my daughters and hubby were helping.
This is what the area looks like with the foliage cut back to be used in the sheet mulch.

The first layer of the mulch is a green one, in this case, the foliage I just cut back. it is a thin layer, just enough to encourage all those worms lurking below to come up through the surface for a nice fresh snack. Before the start of the mulching and after each layer it had to be thoroughly watered to keep it all good and moist for the decomposing process.

Then a layer of newspaper was put down to block out any seeds/weeds from coming up.

On top of that went a two inch layer of more green material, to entice the worms up through the newspaper as it decomposes.

The next layer is again a mulching material, and this stage can actually be have any seeds left on the plants, as they will decompose over the winter. I cut back all the plants around the gardens that had gone to seed, mostly utilizing the Goldenrod that grows all over. Once I started cutting it down, I was surprised to find how much there was. With that I was able to put down a great six inch layer. So at this stage I had an inch of green, the newspaper, which was about another half inch, two inches of greens, 6 inches of rough plants, for a total so far of about nine plus inches.
 Next I put on a nice layer of rich, black compost,
 from my compost bin.
On top of that went a thick layer of shredded leaves that I got with my lawn mower. If you look closely at this photo you can see how excited Abby was with the whole process, as she sleeps soundly, enjoying the warmth of the autumn sun on the driveway!!!
 You can see that it is almost up to the top of the fencing, which is about 12-14 inches.

And the final layer was about three inches of seed free greens, for which I used the Jewelweed which had been all around the woods. This was the easiest to harvest as it just came right up with very little effort. This ended up being over twelve inches.And this is the start of the path in the Spruce area, where the other new edible area is also being sheet mulched.
In continuing my work on this crab bed, I carefully removed plants to free up space in the middle of the bed.

This area gets full sun all day, so it will be the perfect location for those sun loving vegetables, maybe some corn, beans, tomatoes. Will have to figure out what will go where over the winter. As I worked on freeing up space I needed to think about how to position paths through the bed so that I would be able to easily reach all plants.

Also I realized that once a frost hit I would not know what space the plants I was going to be leaving would take up. And then it occurred to me that they would all not be up first thing in the spring when I would be starting to need to plant vegetables. So that meant I needed to have a way to see where I would be able to be planting in the spring.
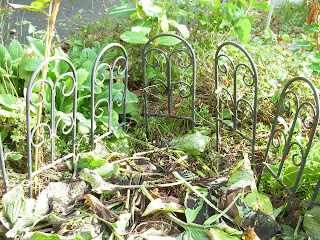
See, at my age, I just can't make a mental note, as that will be gone as soon as I leave the area. Also, if I put it on paper I probably won't have a clue that I did it, let alone be able to find it when needed next year. Thus I decided to utilize my portable fencing that would have been getting stored away for the winter. And for $1 a foot at Lowe's I picked up 10 ft for additional use.
As I started to lace this fencing at the edges of where existing plants would be coming up, I got a clearer picture of the space available as well as the boundaries for my mulching. This is a wire fencing that I got which can be adjusted to any size. You just attach each successive piece to the prior one and can set it into any shape. It worked great around the strawberries this season, keeping the rabbits at bay. Unfortunately the birds still had free access, but we did get lots of berries.

This is the fencing I got at Lowe's, in 2 foot sections.

Now the area has been cleared and I have started to set up the path. I made it into a cross to be able to maximize the plants to be reached. I used fabric 12 inches wide, then put newspaper on it and wood chips. I tried mulch first and then realized that wood chips would be more appropriate.

The wood chips will be about 4 inches deep when I am finished.

The fencing serves another great purpose. It will be the barrier for the mulch, so as to not suffocate the existing plants. And as it is about 12 inches high, it will let me know when I have put down enough mulch to achieve my 12 inch depth.

When the surrounding perennials come up next spring they will completely mask the path.
Before starting the process I tested the soil and found that I needed to improve the Nitrogen, Phosphorous and Potash. I guess my plants just looked like they had all the nutrients they needed. In the Permaculture process I will be adding specific plants in the area that will supply the nutrients on an ongoing basis, so that these will be the only additives I will be needing.
For the Nitrogen I used Dried Blood, for the Potash, Greensand and then Phosphorous. Locally I found that Lowe's did not carry any soil additives. Agway in Franklin has a great supply of anything you could need. I let these soak in for a few days before beginning the mulching.
For the actual planting area the sheet mulching is a specific process. First you need to have the whole area thoroughly soaked before even beginning the mulching. Then you need an inch layer of green mulch to attract the worms up from the ground to begin the whole process. I used clippings from the gardens and grass that I had dug up from an area that we are setting in a new path and ground cover instead of lawn.
Initially I thought I would have to purchase hay for this mulch, but as I started to get into it I realized that I have alot of mulching resources all around me.  The work on this has taken a couple of weeks to get through as it is quite physical and needs to be spread out or done with help.
This is my first foray into sheet mulching. It is a method of preparing your soil for the next crop of plants/vegetables. I have previously referenced the book "Gaia's garden" by Toby Hemenway, which has been my introduction to Permaculture. I decided to try different methods of preparing new areas for edible plantings. It will include vegetables, edible perennials and perennial vegetables.
I have always focused on perennials and only dabbled in vegetables, leaving that part of our gardening to my hubby. In the past we have always been in a decent financial position, but with the way the economy has been going, and us getting closer and closer to retirement, I have been revisiting my focus and realized this season that I need to get more proactive and find more sources of edibles and produce more of our consumables, specifically growing plants that we can eat!
So, with a lot of thought, and great anguish, I took on the task of freeing up space for edibles in the front yard, which is the only place we have enough sun to grow them. Seeing as how it is mostly lawn in the front, that meant taking a closer look at my existing gardens, and deciding to clear out areas for this purpose. This meant having to give up many of my most prized plants and shrubs, the ones that I have been doting on for oh, so many years. The ones I sweat for preparing the original beds, and planted so lovingly, and admired so happily all these years.
And then a funny thing started happening. As I was enjoying giving away all those plants in my initial offers, it got easier and easier to part with a favorite plant here and there. And then when I realized that I needed so much more room for this new permaculture project, I bit the bullet and just cleared out the middle of the two older main beds that held my most cherished plants. I set it up that I would work on clearing specific areas when I had someone here to help with the process who would also be the one to adopt the plants being removed.
Over the course of the summer, with so much help here in the gardens, it was easier to clear out the plants knowing that they would be going to such loving gardens. As I got further into the process, I found myself giving away so much more that I ever could have thought imaginable. And I learned so much in the giving.
Giving is where it is at. Being able to share what you have with others just expands your own world so much more than you can begin to imagine. And when you understand that it is the people in your life, and only the people that matter, giving away the things is just so much easier than you can know until you start to do it.
This is the area I call the Crab bed, in full bloom this summer. These are the beautiful Sundrops amid the Peonies and Hosta.
 These are the Milkweed, Liatris, and Bee Balm awaiting all the Monarchs and Swallowtails.

Here is the spectacular Black Eyed Susan in front of the Peonies.

And here you can see how full the Crab bed was.

And this is what the area under the Crab Apple tree started to look like

once I started removing plants.

I will continue to chronicle my progress, but now I need to get out in the gardens!!


