Friday, October 31, 2008

Kousa Dogwood fruit

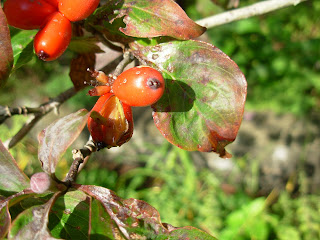
In researching edible wild plants I came across an article about the fruit of the Kousa Dogwood tree. It sounded like something I wanted to try, so I was excited to hear that my friend and fellow gardener, Michelle has a Kousa. The Kousa Dogwood, Cornus kousa, is also known as the Chinese Dogwood. It is the Dogwood with the late season white flowers. I had never seen the fruit before, so was quite surprised when Michelle brought some over. It is very striking. As you can see from the photo the berries are red and have a very distinct shape. You will notice that they are varying shades of red, which is due to their ripeness. Upon first taste I found the berry to be very bitter and the skin very distasteful. After googling it I found out that only the inner pulp is edible, and that it needs to be fully ripe before becoming tasty.


The berry on the left is not ripe yet. The one on the right, which is bulging and much darker is fully ripe.


You need to pull the berry apart and just suck in the pulp, which is a delicate blob of a very different pleasant to me taste.


It reminds me of a special nectar, and why should it be enjoyed only by the birds.


I found that not every berry had a seed, which seemed curious. Nevertheless I kept the seeds I did find, dried them out and have planted them. We shall see if and when I get my own berry toting Kousa!!


Naturally I went right out and tried the berries from my red Dogwood out front. Ugh, they were disgusting!!! Let the birds have 'em!! LOL

Thursday, October 30, 2008

My new edible/perennial bed

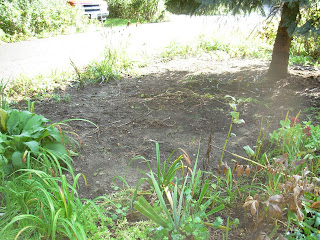
This is the Spruce bed where I cleared out the inner plants for more edibles next year.


This close up shows just how much got taken out, leaving plenty of room for larger vegetable plants.


I've set up the fencing to outline the area and get it ready for mulching.


T
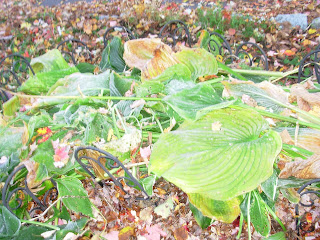
hese are the giant Hosta leaves, on the top layer, which I have cut just for this purpose.


Here is the completed bed all mulched and frosty after the first hard frost of the fall.


This is what the Spruce bed now looks like.


And this is the crab bed on the same day. This was prepared a week before the Spruce area.


And you can see that it has already settled to have of its original thickness. By the time I plant in the spring it will be a rich dark compost eagerly awaiting all the edibles it will nourish next year.


Wednesday, October 29, 2008

New edibles from my foraging hike

These are several of the new edibles I learned about on my foraging hike in Birchwold Farm. This is Indian Cucumber Root. It is a plant that is not very common, so it is not to be harvested for more than a taste. The root is very small, so it is just enough to get a taste of the cucumber richness it possesses. I have it in my woods, but the group has only about a dozen plants, so I won't be harvesting it any time in the near future.


These are acorns from various Oak trees. I was looking for softer wood Oak trees, which have the rounded leaves, but was unsuccessful in finding any acorns from them as I was looking too late in the season. Next year I will have to scope out these softer wood trees sooner so as to harvest some of the acorns before the squirrels get them all. The softer wood acorns are sweet enough that you can eat them raw. The other, harder wood acorns need to be processed, which is a longer process I just didn't have the time for this year, what with getting my new edible beds ready.


These are Salsify, or Oyster plant seeds. I was able to harvest the seeds, and planted them in anticipation of tasting the roots next spring to see if they really do taste like oysters or not. Mia loves oysters, so I think it will be interesting to try them. In any case, the spring leaves are used similar to dandelion leaves, so I will be picking plenty for salads, soups and stews.


The seeds have a fluffy parachute, similar to those of the Dandelion.


This is the stalk from Burdock. I had picked these to try and never got around to it. You put them in a batter of egg and flour and saute, as they do in Sicily. I harvested some seed and planted it, and then discovered that I have it all over the side area of our yard, so will be sure to try it next year.


These are the berries and raisins from Viburnum. The berries are very pleasant and
you pick the raisins from them right off the tree in late September. I have been adding them to granola. They are tiny, but a nice addition.


These are blue and black huckleberries, which taste similar to blueberries.


Now what I need to do is remember to keep track of the calendar for these tasty wild edibles. I have two new guidebooks that both have calenders for easier foraging.

"Wild Plants I Have Known and Eaten", by Russ Cohen (who led our foraging hike) is specifically about plants of our area.

"Edible Wild Plants, A North American Field Guide", by Thomas S. Elias and Peter A Dykeman, has terrific photographs of all the plants in it. It is one of the best guides I looked at since so many of them use only sketches. I find the photos so much easier to use for identifying purposes.

So now I am armed with the guides and information I need to get my foraging going first thing in the spring. This fall I was quite pleased with the mild weather as I have been out gathering lots of leaves from Dandelion, Plantain, Violets, and other spring greens for soups and stews. I have noted where these plants are coming up so that they don't get killed off or mowed down in the future.

Tuesday, October 28, 2008

Autumn Olive

It has taken a while for me to get this post ready for writing. Every time I thought I was ready I would realize I needed more photos as this is a shrub that was unknown to me up until my foraging hike, even though I was to discover that I have tow of them in my own yard!!

This is definitely an important post for anyone who wants to expand their fresh produce for no money.

Autumn Olive, Elaeagnus umbellata, is a shrub in the area that is on the MA banned plant list. It was brought into the area to be used for erosion prevention. It has become an invasive species in the area right up there with Bittersweet and Kudzu. But it does have its redeeming qualities. The berries are a great easily harvested source of lycophene, containing eighteen times that in tomatoes in its raw form, and more when cooked.

I was unaware of its existence until I went to that edible wild food seminar at my library. The presenter, Russ Cohen, gave us pieces of Autumn Olive fruit leather, and it was just great!

Russ is a seasoned forager who took us on a great hike at Birchwold Farm here in Wrentham, pointing out almost 30 species of edibles right at our back door!


Autumn Olive, so named because it looks like an Olive tree in the Autumn, is on the MA Banned Plant list. That means it can't be sold, imported , traded or planted here in MA. That is because it is invasive to our native species and in some cases has overrun and killed off many. All the more reason to locate some and harvest those berries so that the seeds do not get distributed all over buy the birds. This beautiful shrub has the most fragrant flowers in the spring. Any of you who visited my gardens then will remember that fragrant scent coming from both sides of the yard. And that is because I have two of them gracing the perimeters and didn't know it. I thought they were Deutzia. That was the closest shrub I could come up with years ago when trying to identify those fragrant blossoms. Now I know better!! All the while I have been harboring a source of berries that are truly more healthy for us than tomatoes!!!

So I started out having to wait until they were ripe, which wasn't until the beginning of this month. Prior to that, you would not like them as they are so tart, that once in your mouth, you spit them out with the first bite!! But with patience I waited and found that they did indeed become a terrific sweet tart taste treat. I have been picking berries since the beginning of the month, have enlisted my hubby, two daughters, and two grandkids to help, so that we have been cooking and dehydrating so many berries that my dehydrator is now burning out!! The kids all love the fruit leather so much I can't keep up with their desire for it. A 100% natural snack, that they love, that is free!! What could be better!!


The berries start out green, then yellow, orange then red with silver spots all over.


When fully ripe they become a bright deep red plump with the juice often bursting out upon a strong contact. The berries are plentiful all over the bushes.


And, as my adult daughter found out they are very easy picking! In half an hour I was able to pick a gallon just myself! It takes about two gallons to make just one patch of fruit leather, so there is a lot of picking involved. But each bush has so many berries that it is an easy process.
So this is what the ripe berries look like.


I find that I get a lot of leaves and unripe berries in my bucket, but since I strain them out, it doesn't matter. I use different buckets in the picking. I have a cut out milk gallon, with a rope through the handle that can be used over your head so that you can pick hands free. That is the most popular picking bucket. I have fashioned some scoop type buckets out of heavier plastic, but they don't hold a candle to the milk gallon as it keeps both hands available for picking. For the low branches, i just sit on the ground and position a large bucket under a given branch and just swoop the berries right into the bucket with both hands.


The next step is the cleaning of the berries. When it was nice outside we just sat out on the steps and would fill a bucket with water and put in a few scoops of berries at ta time. You keep the water level a few inches higher than the berries. Then you just move your hands through the berries gently, so that the leaves, stems, and other matter ( Often got snails in our buckets and other bugs!!) float to the top and can be skimmed off.


Then I strain out the excess water.


And put them into zip lock bags if I am not cooking them right away. I keep some in the refrigerator for snacking and if I am going to be cooking them soon. And some I put right into the freezer for future use. I don't bother to get rid of the stems as we can sort them out when snacking and they get sieved out when cooked. The seeds are edible. They are not as big as grape seeds, and I just eat them with the berries.


Once clean I use a large Teflon coated pot (for easier cleanup) with only about 1/8 inch of water to keep from scorching the berries. The berries need to be simmered for 30 minutes. As i don't have a food mill, I mash the berries before they get too hot, then stir as needed to keep from scorching. The mixture gets real frothy.

Next I pour the hot liquid (you can let it cool down, or not, it doesn't seem to make a big difference) into my sieve and push it through with a wooden spoon scraping the sides and mashing it more as I go.


When I am left with just seeds, stems and other "stuff", I scrape the bottom of the sieve


and then ladle the fruit puree into the food dehydrator, using the plastic liner that you get for fruit leather.


It takes about 21 hours to produce the fruit leather. When complete it has turned to a nice deep maroon.


Here is the completed rolled fruit leather.


As I don't measure the berries, I use the left over puree for a great snack, to mix with with applesauce or I just put it in a pan to freeze. After it is frozen I break it up into pieces to use for future cooking or in my daily fruit smoothies, in place of blueberries, which have less lycophene.

It is not too late to find some yourself. There are huge areas of Autumn Olive bushes at Birchwold with lots of berries ripe for the picking. I will be heading out a few times later in the week to get more berries myself if you want to join me or need help in identifying the bushes.

AH! A spare moment

Finally found a spare moment to get to a post. It is very busy around here. We have been going through some changing times in my immediate family. At this difficult economic time, my son in law was laid off, and as soon as they short sell their home, they are moving in with us. Because that's what families do. Stick together during the hard times and help each other in whatever way is possible. When they moved back East from Tucson four years ago they lived with us until they found their house. Now they will be back and I am looking forward to it.

As a single parent with two children in the 70's, it was difficult handling all that life throws at you alone. Divorce was a very bad word then, and most especially in a Catholic family. My family made the decision to turn their back on me, and for that very reason, I would never do it to anyone else. Enough said. My focus now is on getting this house ready for influx of family!! They are already coming over and helping with the process. My tow and a half year old, oh, so sweet Katelyn helped to move a lot of my craft stuffing into an attic yesterday. She had so much fun locking Paula and I in the attic and we could picture her strutting around the house as if she were the Lady of the manor, with us at her mercy!! It was so funny to see her face when she told us she had locked us in jail for being bad. (The day before she had been choking on food at dinner and I had to perform the Heimlich on her, so she was dealing with a little (or a lot!!) of residual anger over me hitting her so hard on the back!!! LOL!!!

How can you not just absolutely just love them!!!!

Both grandkids are taking turns helping out around here as it will take a great deal of work and ingenuity to maximize the space here and get it set up for the big transition.

Just using this post as a way to let you know why I am so otherwise occupied. I still have lots of photos to go through, and lost of gardening stories to tell, and information to relay.

Thanks for your patience and your continued presence here at my blog.

Sunday, October 26, 2008

Fall preparation for next spring's gardens

I have been very busy getting my gardens ready for next season.
This is the well established Hydrangea that I gave to one of our gardeners to make room for more garden area for vegetables.


Once it got removed I did a layering mulch over the area to get it ready for next spring's plants.
I had some tomato and eggplant in the area this season. By getting rid of the Hydrangea it doubled the available space. This is what it looks like now, with the mulch layering almost complete. I will be adding a nice layer of peat moss on top for the winter. It will be all ready for spring planting as soon as I am ready for it.


This is the other Hydrangea which was right in the front of the house, which was removed at the end of the summer.
It freed up more space close to my front door for easy access during the early winter. I have planted Jerusalem Artichokes, Daylily and Chives there for harvesting in the cold weather, and lots of Garlic too.


This is another smaller Hydrangea from the front area. We moved it to where the white shrub rose bush was, to free up space for all the Fennel in that area. In researching on the internet I have found many culinary uses for the Fennel leaves and seeds. Of course, I will still be using these plants for my butterfly caterpillars, but it is great fun to find other uses for it that will benefit our palates!


This is what the front of the house looks like now, with all the plants cut down, having been used in my mulch layers.


The strawberries are ready for the winter with a new bedding of pine needle mulch.


I've also cleared out a large area in front of the large White Hydrangea at the side of the house, for greens that will appreciate the shade from the trees in the woods when it starts to get hotter next season.


Saturday, October 25, 2008

Dogwood seeds

This gardening season has been a learning experience for me. Having been sick for a few years, I was out of the gardening loop. Due to lots of medication over those years I found that I had not retained all my gardening as I would have liked. Since I had not let my plants go to seed in a number of years, it was like doing it all over again for the first time. Many of the varieties I had no problem with as I had so many seedlings coming up every year. Some plants were more difficult as I had not had seeds from them in the past or had not paid attention to that part of their growth.

As one of my gardeners had requested that i take photos of all of the plant stages, I worked on it all season. I just didn't have the time to post them due to time required in the gardens. It is a process I will be working on over the fall and winter. I have thousands of photos that I took during the season, and I will be sorting them to get them posted to this blog.

So by now most of you should know that I mistakenly gave out what I thought were Red Dogwood seeds in the spring. They were only the barren flower bracts that had come down in a heavy rainstorm. This is a branch from the Red Dogwood out front showing how its berries are ripening.


They turn red as they mature. You can see there is a berry below the one in this photo that has split open. It was opened by birds trying to eat it.


Here is an opened berry in plain sight. The flesh is yellow, making it a great contrast to the bright red skin.


And this photo shows a slew of berries on the ground under the tree. When the berries were at their ripest we had continuous swarms of all different birds feasting like there was no tomorrow. And what a mess they made!! Berries all over!!


Strewn all over the path. Tossed haphazardly around the gardens.


Even falling under some fall colored poison ivy. Who knew it could look so pretty in the fall? I usually get it all out early in the season. but , due to such a wet summer, it was coming up all over throughout the season.


This is what the berries and seeds from within look like.


Berries get harvested in November for planting for seedlings which will start coming up next spring. I have swept all the seeds on the path into the gardens so that they can start coming up for anyone to have next year!!

Friday, October 24, 2008

Some email

Oh Marna, what will I do without your daily Blog... Please do stay in touch with all you are up to. I was busy today dead heading my black eyed susan (I do not need anymore of those!!) I was also taking off all the other dead flowers and planting the seeds from the plants I want more of ; ) Those Cleome sure seed themselves quickly!! I planted them right before all that rain and they are coming up so nicely already. I hope they don't die over the winter...maybe I should have waited till Spring to plant? Moved a lot of plants too!! Have fun with your Grandkids and everything else you will be doing this winter.
Keep in touch,
Sara

Marna,
I check your blog often and find it a wealth of information.
Thank you for inviting me into your garden, I wish I could have come by more often, you are an inspiration!
Thanks for everything,
Christine

Hi Christine, You are very welcome. I am planning on continuing the blog, just not every day. Having some family issues that need more of my attention.
You will be welcome to come by again next season - I will be having offers and more next year.

Looking forward to seeing you then, Marna

Butterfly Weed Seeds


Butterfly Weed, Asclepia tuberosa, is an orange flowering native perennial. As orange is one of my least favorite colors on this plant, I only got one plant as it is an important butterfly attracting plant. Since I have been reexamining my gardening habits, I decided to give more orange a chance last year when I moved sever of the double orange Daylilies into my main perennial beds. I found them to be not too unpleasant to look at, especially due to their magnificent blooms! So in watching all the butterflies at the butterfly Weed all season I started to think about having more of it. And since I was letting my perennials go to seed, it was natural to let this go to seed also. I could not remember having any Butterfly Weed seedlings and now I know why.


They take forever to form their seeds!! That and all the hosta around here.


Last week the seed pods just started to finally dry and I found one that had burst open and was ready to send its seeds, which are attached to fluffy white parachutes like those of milkweed, waiting for the next gust of wind to float them away. Luckily I noticed them before they were dispersed and I took them inside.


This one had a great spider on it, which wouldn't go away until I got its picture!!


By the weekend more of the pods started to ripen, so I cut the stems, brought them in and placed the stems in a vase with water to allow them to continue to ripen.


As I have been doing with all the seed pods I collect I took them in to my living room to be able to sit on the couch and harvest them.


Well!! That was not the right thing to do. The first one that I opened burst out all over the room. There were little with fluffy parachutes flying all over!!LOL!! Whenever I would try to remove the seeds, they would just pop out all over!! Had to put them in a room all by themselves for a long time out, before I was ready to try again.

I finally figured out a way to harness the white fluff by rolling it all together in one hand, so that I could get the seeds.

And thus my seed offer!! Interesting how few people responded to the offer. These seeds took all summer and September and October to form. Oh well, all the more to plant here for new plants next year!! It is a beautiful plant!!