As I was browsing through photos for posts, I came upon these which I had been unable to locate at the time of writing the posts about them.
These are photos of Groundnut, Apios Americana, which I wrote about on 11-14. It gets quite viney, as you can see by how this one has grown right up the tall support pole for one of our bird houses.
Once you become familiar with it, it becomes quite easy to identify as it grows on top of other plants and has very distinct leaves.
This is the area under the Blue Spruce, which had been so overgrown that it was impossible to see what was trying to grow there. This is what it looked like before the pruning of the Spruce. The Lamb's Ears was totally overgrown by the heavy Spruce branches.
And this is what it became once the lower branches were pruned back. Now you can clearly see the group of Lamb's Ears, Stachys Byzantina, which had been coping with the crowded area.
The Lamb's Ears is now joined by its new neighbor, Heather, which was transplanted out from the entanglement of Bittersweet roots.
This Heather is due for a much better time in the spring when it will have the opportunity to grow free of the Bittersweet roots that it had been plagued with.
Interestingly I found several patches of Lamb's Ears seedlings getting ready to be moved on to new homes next year. It is the first time they have seeded themselves!!
Saturday, November 29, 2008
Thursday, November 27, 2008
Sara's view
I finally got these photos transferred correctly! Enjoy Sara's view!!
This is an email I got recently. Look at Sara's beautiful view.
Hi Marna,
I hope you are feeling better. I was looking through some pictures and found these of the pond behind my house. It is so beautiful in the Spring & Winter when the leaves on the trees are gone. This is why I want to cut a few of the smaller trees down to enjoy this view all year round.
Wednesday, November 26, 2008
Thanksgiving
At this time of thanksgiving, I want to thank all of you who made this past gardening season my best yet. I look forward to many more, sharing the gardens and all they provide with even more of you in the future.
I never imagined the joy you would bring to these gardens, in the form of your company, your friendship and your participation in all that transpired over the months. As we sit down for our Thanksgiving dinners, as is our tradition, we will be giving thanks and looking ahead to all that life will bring to us in the future.
May this feast day find you surrounded by your loved ones, basking in the glow that only love can bring.
Monday, November 24, 2008
Storing onions
Had a question from Michelle that I thought might be helpful to others.
Hey, do you have any tips on storing onions? It looks like we are going to lose half of our onion crop because the darn things keep growing!
Hi Michelle,
I have not had any personal experience storing onions. Will be planting them next years, so figured I would research it for you. This probably provides more information than you need, but it will be helpful to me for next season to have it all in one place for reference at that time. (Providing, of course, that I have onion to store!!) LOL
I have several reference books that I have used over the years. For this question I first went to my trusty "Crockett's Victory Garden", by James Underwood Crockett, 1977 by WGBH Educational Foundation, Inc. and James Underwood Crockett. James Crockett originated the Victory Garden show back in the 70's. I was a devoted fan.
re: Onions
"I cure them after pulling, letting them dry in the sun for 2 or 3 days, and then moving them to a dry warm place for 4 to 6 weeks until the skins are completely dry and the tops withered. Then I store them in a cool, airy spot for use through the fall and winter.
As you pull your onions, you will probably observe that the stalks of some are much thicker than others. Sometimes they are called "thick-necked, or "bull-necked." These onions will not store as well as do those whose stalks shrivel away completely, so I advise using these first. If you want to store your onions in an open mesh bag, cut the stalks off about an inch or two above the bulbs when you pull them,. If you want to braid them so as to hang the bulbs in an airy place, do the braiding soon after digging because the stalks will still be relatively pliant. Above all, don't pile freshly picked onions more than two deep; without air circulation, they're apt to start new root growth in the dampness, or worse yet, to rot."
The second book I am referencing is "10,000 Garden Questions, Answered by 20 Experts," by Marjorie J. Dietz, Editor, Originally Edited by F. F. Rockwell, Fourth Edition, 1982, Doubleday and Company, Inc..
As there are several questions regarding this issue, I will just take them one by one here.
re: Winter Storage
"Onions should be kept in the dark, in a dry place at 35 - 40 degrees. But cure them in trays or boxes, under cover, but with free circulation of air, for several weeks after harvesting.
"How do I keep dry onions from sprouting in the winter months?" If onions are kept too warm in a room where the air is moist or where light enters, they will sprout. Some onions will sprout more than others because the bulbs have not been properly cured. Some varieties keep better than others. The best winter keeper is "Spartan Sleeper", which can be stored at room temperature for 6 months or more before spoiling.
"I pulled and stored my onions and found that the majority are going bad. Why?" Fungi following after maggot injury are responsible. Onions should be stored only where there is free air circulation, either in a string bag or else with the tops left on an braided into chains to hang up on the wall. The latter method is easy and very successful, and you can always cut off just the size onion you want without rummaging through a bag."
Sunday, November 23, 2008
Sheet mulch update
As you can see from these photos, the sheet mulch beds are shrinking. As there was no rain for quite a while it seemed as though these would never shrink down. It's only been five weeks since this bed was finished and the mulch is only about three inches deep now. It was about fourteen inches to begin with.
This other bed was completed about three weeks ago and is about 5-6 inches deep.
You know something is supposed to work a certain way, but when you actually see it happening it just makes it more real!! I never thought it would begin to compost so quickly. I figure it would take much longer to get to these levels! And how great to not have snow yet to be able to watch it progress.
Saturday, November 22, 2008
A tasty soup from the gardens
Sometimes what I do makes sense, and other times I do wonder what is going on in my mind. Take yesterday, for instance. It was the coldest day so far, only in the 20's, and it is not even winter yet. I am coping with my indoor temperature of 62 degrees, dressed in extra layers to keep me warm. I look at how cold it is outside, and knowing Mia has a cold, think how nice it would be to make some homemade soup to have for her today. So I raid the freezer for broth and then think how great it would be to have fresh greens to pump up her immune system.
Fresh greens, you think, and where to get them?? In the gardens, of course! So I check out the window at the newly planted herb garden right outside the living room window. What a great idea that was!! I can just look out the window and gauge whether I can harvest anything on any given day. I did not come up with the idea on my own. I learned about zone gardening in Toby Hemenway's great book, "Gaia's Garden". (He explains how having certain plantings closer to the house, for those plants you would use more frequently, would make it easier for harvesting and maintenance. How right he was!! LOL How much easier it is for me to just look and see what's available, then to have to get all bundled up and hike out to the different plants. This way they are all together in an area close enough to just run outside quick and get what I need! Also, being closer to the house, the frost will not be as quick to freeze up my herbs.)
Sure enough, the Dandelion greens are still growing, not being frozen stiff yet.
Also, the Parsley,
both varieties,
the Thyme,
and Chives have not been affected.
So I get bundled up, with scissors and basket in hand and head out with the supervision of my granddog, Riley, who is visiting for the weekend, (AGAIN!!!) But I do not complain, he is great and has much better behavior than Abby!! And he knows good enough to stay out of my path so that he does not get bumped into all the time like Abby does! LOL
I find that is is very, very cold outside and I quickly scope out those plants that are still able to be utilized. As it is nice and sunny I opt for those furthest away from the house, as I realize they won't be usable much longer. I find several Dandelions,
Plantain,
and Violets to pick the tender young leaves from.
The Violets are more difficult to harvest. Those areas that usually have Violets and Plantain all over have been heavily affected by all the frost and they are gone. But in the areas where we left the leaves for winter mulch I found lots still growing. As I have to brush away the fallen leaves in the areas where we have left the leaves for winter mulch, I find myself out much longer than anticipated. But it is well worth the effort as there are so many to choose from. The leaf mulch has created a great nestling blanket which is keeping the frost from decimating these tender shoots. Up until now that is, who knows how much longer I can harvest them. But it is November 21, and what a gift to be able to still be doing this. Free Greens!!! Keep 'em coming!!
Have to snip quickly as it is very cold outside.
But then my eye catches the Daylily patch right by the garage. And I immediately think how great some tubers would be in the soup. I have used up all the Jerusalem Artichokes which we enjoyed so much and have no potatoes on hand. It is about noon time and the sun, nice and bright, is providing some warmth, so I go and get my kneeler, trusty Cape Cod Weeder and a pitchfork.
To harvest Daylily tubers I have learned that you just need to lift the plant up with a pitchfork and it exposes the tubers. You can cut the fresh ones off (they are a brighter yellow than the older ones), and then reposition the plant back in the ground.
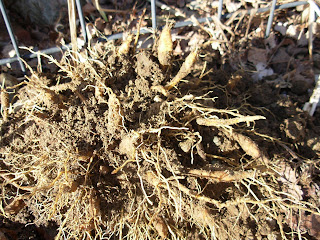
I found the soil not frozen and very easy to work with. I only had to lift the plant a bit and got right to the tubers, with the help of a friendly earthworm who decided to join me. Initially not many tubers can be easily seen as they are covered in dirt.
With just a little work with my weeder, I am able to easily get to the tubers, and start to cut. This is what they look like before being cut. They have little roots from the end,
and are attached to the plant by a thicker length of root. You can see there are several on this one plant.
After being cut from the plants and their little roots snipped off, this is what they look like.
And this is the batch after they have been scrubbed and readied for cooking. They can be eaten raw, but on this cold day they all went right into a pot of soup. I harvested almost 60 tubers from two plants.
And these are the greens that will be joining them! Not a bad day's work!
I added in some left over rice and beans and spaghetti sauce, some frozen vegetables and came up with a great vegetable soup for supper.
So that is how I spent over two hours outside on such a cold fall day, harvesting free, fresh ingredients for my dinner soup! By the time I got back inside, my 62 degree indoor temperature felt quite toasty!!
And I can see myself doing it a lot over the winter as I planted a large group of Daylilies right around my septic tank, right in front of my front door, where the thyme never freezes due to the heat from the septic tank! Even if it snows, I will be able to get at this great new patch right outside my door!!
Friday, November 21, 2008
Late season bounty/blooms
Isn't it wonderful how growth continues even when least expected. After the first frosts I found myself in awe of all that continued to grow and produce!
This tomato plant was on the south side of the house and produced for one month beyond the others which were in front of the house on the east side. The difference in these positions is that the south side gets more sun. By mid day the trees shade the front, but not the south side! So we had prolonged tomatoes on the south. Only problem is that the south side is where my house filters has its outflow, which is very salty water, so that I am unable to plant much there. I will have to remember to plant a tomato there each year since it worked out so well this past season. Aha - just had a thought! That spot where it is so salty will be perfect for my little portable greenhouse!
This is New England Aster, which is still trying to produce complete flowers, without great success!! but still, it got my attention!
This is purple Closed Gentian, Gentiana clausa, a native which is a late season bloomer, also known as Bottle Gentian.
Microclimate
My blue Spruce is a magnificent tree. It has grown so fast that I have been compelled had to move plants regularly from the low spreading branches. In driving around the area, I would always look at similar trees to see how I liked them with or without the bottom branches. I have cut the very lowest branches off when they were dragging on the ground.
In his book on Permaculture, Toby Hemenway talks about microclimates. It is the space created under the canopy of a tree when the bottom branches are removed. Due to the shelter provided by the tree branches a snug haven is created where plants can benefit from warmer temperatures during the cold weather, and shade protection from the summer's hot sun. As I had not thought about it in that light in the past I decided to cut off the lower branches for just that purpose.
This is the lower section showing how the Spruce is smothering the plants at its base, each year growing further outward and forcing the removal of everything in its path. Here the Lamb's Ear is struggling to survive under the weight of the Spruce's branches.
And here is a Peony reaching outward to get away from the Spruce.
I couldn't find a picture of the full Spruce before I started to trim the bottom branches, but here it is in the middle of this season with the lower branches removed to give the above plants some breathing room.
This shows how I would typically remove the plants that were getting crowded out by the branches above.
On this side of the Spruce I had even thinned one side of a Hydrangea to give its branches more room to grow.
In reexamining all the gardens, I decided to forego those lower branches to keep from having to remove the smaller plants around the tree in favor of creating a microclimate beneath the Spruce. Next spring I will move my Lady Slipper there as well as other plants that will benefit from the shelter of the Spruce.
As I removed the branches, I noticed mushrooms growing under the tree, so I am thinking that would be a great spot to buy some edible mushrooms and cultivate my own supply!
For my final garden chores, I made it possible to navigate this new edible bed by trimming the ends of the branches that kept poking me in the eye while I was doing the sheet mulching. This is the final result.
Thursday, November 20, 2008
A struggling rose
This poor Rose is so sparse and sickly due to a battle with Bittersweet roots.
Usually when going through my photos I look for a spectacular specimen to post about. Today when sorting through pictures I came across this one I took of a rose that has been struggling the past few years. It is a shrub rose, the only ones I now have in my gardens as I have found the other roses just too much work for these gardens. I have enjoyed many varieties of roses over the years, but with all the work required to keep them healthy and thriving, they just are not my favorites. This past season I gave away several of my older rose bushes in my quest to make way for my new wave of gardening which will include more edibles.
In reviewing all my gardens I have had to make lots of decisions over the years regarding plants that just weren't doing well here. In this case, it has nothing to do with the individual rose. In the past it has performed quite beautifully, but since I got sick, the dreaded Bittersweet has taken over a few areas of gardens, making it impossible for the existing plants to thrive. This rose was right in front of the burning bush hedge, which had concealed the ever creeping bittersweet that had made its way into the root system, leeching the nutrients out of the soil and decimating my roses and heather which had been doing quite nicely in that area.
I decided to move them all to give them a better chance of thriving, while putting sturdier plants to deal with the Bitterwsweet.
I put the Heather in front of the Blue Spruce, where it will get the more acid conditions which it loves.
As you can see this Heather is very sparse, but the roots were in good shape once I removed all the Bittersweet roots that had overwhelmed them.
I will give the Heather a hard pruning in the spring which will help to rejuvenate the entire plant. I moved all the Heather to the same area, which is right at the edge of the blue Spruce, where I had cut out a great microclimate area underneath it, in order to plant some more temperate plants next season.
I got my hubby to see that we had way too much lawn, necessitating lots of water, fertilizer and gas in the lawn mower. He agreed that we could easily do with less lawn, so I started staking out the front lawn area to plant around our leeching field, which has added lots of new garden space in full sun for more vegetables and fruits.
And I moved the rose out into a new area where I put several different shrub roses from all over the gardens.
I will be working on getting all of the front lawn down to a minimum. The area over the leeching field will become a patio with a grape arbor, which my hubby says he wants to build - that will remain to be seen!! But I have been carefully saving the seed pods from the Pipevine, and have planted the seeds right under the existing vine in order to have new plants ready for when he does get an arbor built, in case he decides against grapes!! Or, how about more Climbing Hydrangea??
Or Clematis? I now have several climbing varieties of plants to choose from. How fun to have my own stock with several choices!!
So, what about this weather??!! LOL You have to admit, we knew it was coming, as it always does here in New England. But does it always have to be such an abrupt change??!! Out enjoying the sunny mild weather one day and freezing the next!! But, we were indeed fortunate to have had such a mild fall. We saved a bundle on oil and it gave me a chance to get used to 62 degree temperature inside my house this year!!
Wednesday, November 19, 2008
Follow up to Evening Primrose, tasty edible?
Okay, so I found another Evening Primrose patch and dug up another root to try once more, to really give it the good old college try.
And guess what I found out? Well, I boiled this little (about two inch long root, the width of my index finger) Evening Primrose root for 20 minutes and then changed the water and boiled it again for 30 minutes, just to be sure I gave it a fair trial.
And to me it was nasty - so I tried it out with my husband. We both agreed - we will not be harvesting the Evening Primrose roots in the future!! We will try the early spring greens to see how they are, but no more roots!!!
Groundnut post update
Want to share a comment that evoked strong memories:
Michelle said...
Haha! You gave me so many plants and seeds to try, I'm not surprised that you forgot. Your garden is establishing an outpost in our yard!
November 18, 2008 10:57 AM
Hi Michelle, I can't wait to seed the fruits of your efforts next season!! Isn't it wonderful to be able to join a chain of plant sharing that has been going on forever!!!
My gardens are the accumulation of years of gardeners, going all the way back to the 1040's when my aunts started their first gardens, which supplied my Violets and Lilies of the valley!! These are my most prized plants, as they come from such a great background!! Each year when they bloom, they deliver me back to those days growing up surrounded by extended family. It is so awe inspiring to realize that these gardens are supplying the seeds (quite literally) that will become future generations' sources of similar fond memories.
I would like to invite all to develop their own outposts, with all the plants and seeds which have been shared from my gardens. Become inspired over the years to share with others, to get us all more interconnected with each other and with this great Earth, the one we each sink our hands into each spring, when we welcome the earth into our hearts, yet again, for a new season of sharing this great planet we call our home.
Labels:
lily of the valley,
memories,
plant sharing,
violets
Monday, November 17, 2008
Late season blooms
Being in the "off" gardening season, I am sometimes at a loss for what to post about. All I need to do in that case is to go into my photo library and find one or several of the many photos I took during the season that I have not yet written about. Postings from now forward will probably have no rhyme or reason. It will just depend on what photo I stumble on in my travels.
Today there is glorious sunshine which is infusing me(well actually, my soul) with warmth, although it is just an illusion as it is very chilly outside. As the weather seems to be taking a turn right into winter, I am heartened by the knowledge that this mild autumn weather has kept us from having to use much of our oil for heating the house. I think God in His wisdom is helping out those of us who are trying to economize by keeping our thermostats lower this year than in the past. We are working on a daily temperature of 62 degrees. How are you working on keeping your expenses as low as possible? Any ideas that you have found helpful that may be of interest to others? I am adjusting to the lower temperatures here by wearing more layers of clothing, and keeping the house open to the full sunshine on these rare sunny days.
We had company in over the weekend and the temperature went up to 69 degrees with the house full of warm bodies!!!
So these photos are blooms that I found around the gardens in October, which is a month when you rarely see any color at all. The warmer temperatures this past season allowed lots of flowers to bloom again when usually they would have been long gone to rest. I think I had so many extra blooms this year due to the fact that I had let everything go to seed and did not cut back any of my plants until they were actually dead from the frost.
These beautiful Fringed Bleeding Heart flowers were hiding under their foliage, but the distinct color caught my eye amidst the faded hosta leaves next to them.
This wonderful mass of Asters surround the fading Hydrangeas providing a beautiful purple swath around the few blue blooms still in such striking color.
These are Mia's Dahlia's which are enjoying one last day in the warm sunshine before the hard frost is due. Hurray for us, I remembered to dig them before that heavy frost arrived to be able to enjoy them for next year. And I put them in a container in the cellar right near other items I will need in the spring so that I do not forget them!! (Well, hopefully, anyway!! LOL)
This was the greatest surprise of all this fall. This wonderful Clematis has been struggling for several years now. The tree it had been growing on fell in half years ago, and I have been working on keeping it growing ever since, with not much in the way of blooms, as compared to the Clematis by the garage.
So what else is new?? LOL - In trying to get this photo to show what the tree now looks like, it is stuck in this sideways position only in my blog!! I tried twice to get it to change and it won't, so this is what you get!!!
This Clematis has the most delicate purple color, that is does appear white from a distance. It is the same color as the Columbine which started coming up last year. How interesting!! This is one I got back in 1987 that is called a Double Blue color! How great that the season stayed so mild to give it a chance to finally bloom!!!
Labels:
asters,
clematis,
dahloa,
drying hydrangea blooms,
fr bl heart,
late season
Saturday, November 15, 2008
Seeds planted this fall and new plant markers
I made good use of the seed bed which was so generously cleared out by many fellow gardeners this summer. It took me much longer than anticipated to get seeds planted as there was just so much to get done this year. My rows of plantings are covered by leaves for the long winter's rest. The leaves will give some added protection against the harsh winter conditions, but will need to be raked off once the soil warms up in the spring to allow the seeds to grow. Before the leaves fell you can see some of the seeds were starting to grow. These are Cleomes.
I made good use of the Venetian blinds i got through Freecycle. I cut the slats into about 6 inch pieces and labeled them each twice, once for above the ground and once fro below. By writing on them below ground level, that marking will not get washed off by the weather and I will be able to identify them first thing in the spring.
Usually my labels get all wiped out from the weather and I have to wait until things have come up before knowing what it is. And then I can't identify the color until it blooms. This way, thanks Jeanine for this great suggestion, I will be able to know early on just exactly what it is and what color it will be!!
Subscribe to:
Posts (Atom)